
You may still have many video tapes that you like to play but find it hard to connect a VCR to your new flat screen TV. Often this is because you can’t find the right connections on the new TV. This article will explain the different options on how to connect a VCR to a flat screen TV, even if you can’t find the yellow socket.
Basically you need to connect from the “line out” of the VCR to “AV in” of the TV. This needs to be done for both the video and for the audio. Some VCRs have one audio out socket (mono) and some have two audio out sockets (stereo) – we will look at stereo first, and look at the differences for mono later in this article.
Connect a VCR with the Yellow, Red and White Leads
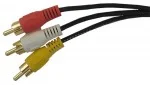
To connect a VCR to most flat screen TVs, you will need a cable with these yellow, red and white connectors. For non European VCRs, you will need a cable with these plugs at each end. For European VCRs, you may need a SCART plug at the VCR end, and these yellow, red and white plugs at the other end to connect to the TV.
The yellow, red and white plugs are often called RCA or Phono plugs. The yellow cable is used for the video signal, the red cable for the right audio, and the white cable for the left audio signal. Many VCRs come with these leads supplied. If you don’t have any, they should be available at most electronic or electrical stores.

If you need a SCART connection for the VCR, make sure the SCART cable is designed for output. If you use a SCART cable made for input, it won’t work as you need an output cable. Some SCART leads or adaptors have a little switch on the SCART plug to allow it to be switched to “IN” or “OUT”. Select “OUT”.
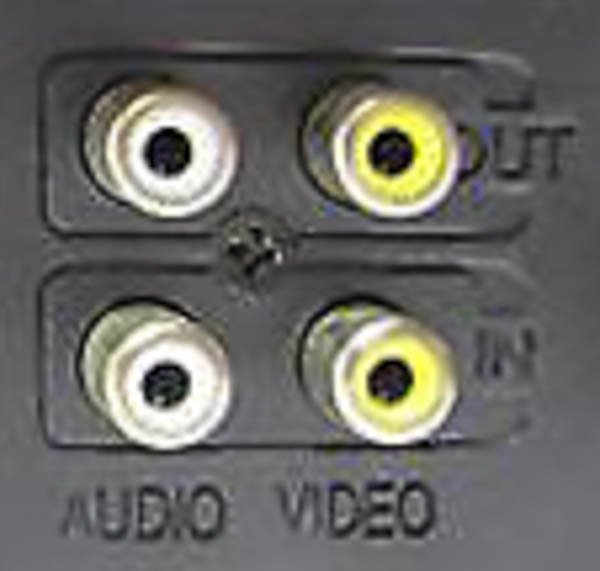
The rear of the VCR
This photo shows the standard connectors on most (stereo) VCRs. If you look closely, on the right hand side are the “line out” sockets (the left hand side is for “line in”, which we don’t use for connecting to a TV). The top right red socket is for the right audio out. The white middle right connector is the left audio out socket. The yellow socket at the bottom right is the video out socket.
The markings or labels on most VCRs are as hard to read as in this photo, so you may need to use a torch to see the markings clearly. Once you have found the line out sockets, it is a simple matter of connecting the yellow, red and white plugs of the connecting cable to the corresponding yellow, red and white line out sockets of the VCR.
The Rear of an Older Flat Screen TV
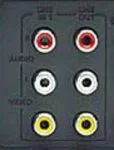
Older flat screen TVs are easy to connect a VCR to as they have at least one yellow “video in” socket. In this photo you can see it just below the centre of the photo, it is labelled “Video”. Below this yellow socket for video in is the corresponding white and red sockets for the left and right audio in.
Having found the yellow, red and white sockets, it is a simple matter of connecting the corresponding yellow, white and red plugs of the cable connected to the VCR to these sockets.
You may have noticed that in this photo, these sockets are in a section labelled “VIDEO 1 IN”. This normally would indicate that this is the input you need to select on the TV to watch the VCR. Most TVs require you to press “Source” or “Input” on the remote control to select the “Video 1” input signal.
Other TVs might label these inputs “AV” (short for Audio/Video).
Some older TVs might have several AV inputs, normally labelled AV 1, AV 2 etc. Some flat screen TVs have the AV input on the side of the TV.
My TV doesn’t have a Yellow Socket!
I get many questions from people saying they can’t find the yellow socket to connect a VCR into. Don’t worry, I have a solution. But first check the sides of your TV to make sure the designers aren’t trying to trick you by hiding the yellow, red and white sockets up one side.
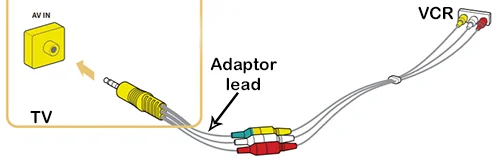
Other TVs have a little yellow socket (like a headphone socket) often labelled “AV In”. These are designed to allow the yellow, red and white leads from the VCR to connect to the TV via a little adaptor lead.
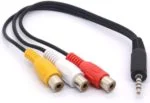
Some manufacturers provide these adaptors with the TV, other manufacturers assume you will buy one if you need to. If you need to buy one, search for “3.5mm AV lead”. Either way, simply plug the leads from the VCR into the adaptor lead and then plug this lead into the TV.
Don’t worry if you can’t find a yellow socket on your TV to connect a VCR, as many new TVs don’t have one. Manufacturers think there is no need to supply TVs with the ability to connect a VCR through the standard (and old) yellow, red and white sockets. Instead some TV’s let you connect to the green socket, and others require you to use a HDMI input. I discuss each method below.
If there is a Green Socket
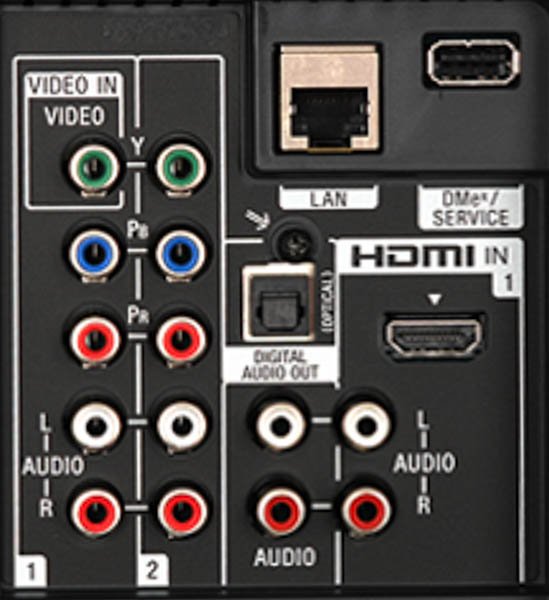
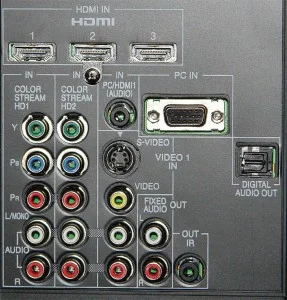
At the rear or side of many flat screen TVs there is no yellow socket for “Video In”. But as you can see in this picture, they indicate you can use the green socket instead. Notice on this TV, (and most others) there is only one of the green sockets nominated as “Video in” for you to connect a VCR to.
So for this TV, you would connect the yellow lead from the VCR to the nominated green “Video in” socket. The red and white audio leads from the VCR would connect to the corresponding red and white audio sockets below the blue and red.
Be careful not to fall into the trap of connecting the red audio cable, to the other red socket labelled “Pr” – the right audio will not work if you do this. Also ensure you don’t connect anything to the blue or red video inputs or your VCR picture will be in black and white only.
Note that not all TVs label the “video in” as clearly as in the photo above. Some simply put a yellow circle around the appropriate green socket. Some use a combination of yellow and green. Others label this socket as “Composite Video”.


Composite Vs Component Video
You don’t need to understand this section – it is for those people who like to understand why it is possible to connect a VCR via the green socket.
The green, blue and red sockets labelled Y, Pb and Pr in the photos above are for connecting a DVD player. These three video signals are called “Component Video”. It is the best way of connecting a DVD player if the DVD player doesn’t have HDMI. The green input from a DVD player is basically the black and white picture. The blue and red inputs are for the colour information of the picture. Then the other red and white sockets are for the right and left audio.
The video signal from a VCR has the black and white picture and the colour information all joined together – called composite video.
Modern TVs are clever enough to know when you only have one lead connected with all the information (composite video) or separate leads (component Video). Hence they don’t need to provide a separate input for Composite only. For a more detailed explanation of component video see this article, or this article to learn more about composite video.
Connect a VCR with HDMI only on the TV
Many new TVs do not have any analogue inputs. Therefore you need to use one of the HDMI inputs on the TV. However you can’t connect your VCR directly to the TV. You need a converter box between the VCR and the TV.
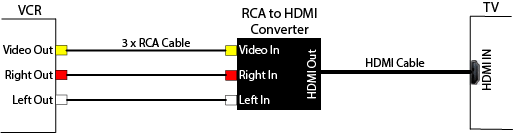
The yellow, red and white lead from the VCR plugs into the input of the converter box. The output of the converter box connects to a HDMI lead. The other end of this lead will plug into one of the HDMI inputs of the TV. Note: Some converter boxes also require a USB lead to be plugged into the TV – this is used to power the unit. Other converter boxes receive power from the HDMI connection to the TV.
If you are going to buy a composite(RCA) to HDMI converter consider these tips:
- Beware, many on-line searches return two types of converters: a RCA to HDMI converter
 and the reverse, a HDMI to RCA converter. To connect a VCR to a TV using HDMI, you need a RCA to HDMI converter.
 - You may also need to buy a short HDMI lead, if you don’t already have a spare one.
 and the reverse, a HDMI to RCA converter. To connect a VCR to a TV using HDMI, you need a RCA to HDMI converter.
My VCR only has a white audio out
Many VCRs are not stereo, they are only mono. That is, they do not output a left and right audio channel. Instead they only output one single audio channel (mono audio). Therefore, they do not have a red and white audio output (for right and left audio). They only have a white output, for the mono audio. You may remember most old TVs only had one speaker, so the VCR only needed one audio channel (mono).
To connect a VCR with only mono audio to a flat screen TV, simply go from the “audio out” socket of the VCR.
That is the easy bit. How you connect to the TV will depend on the TV.
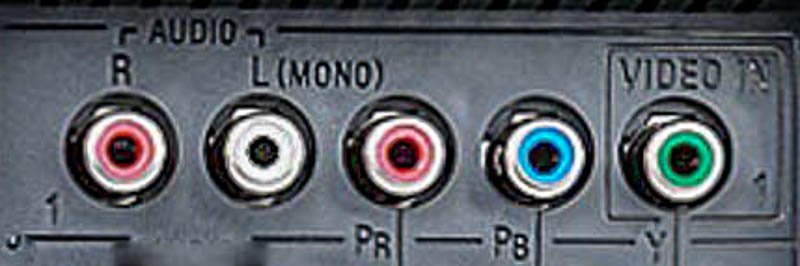
Some TVs will have sockets on the back like this picture. On the left hand side you should see the Audio right (red) and left (white) input sockets. The left socket is also labelled “MONO”. If your TV is like this, then simply connect the “mono out” from the VCR to the “mono in” of the TV. The TV should direct the sound to both (left and right) speakers of the TV.
If your TV does not have a Mono input, then you have two or three options:
- You can simply connect the “mono out” from the VCR to the “Left in” on the TV. This will send the sound to the left speaker only. While you might think this is not ideal, you may be surprised that it sounds fine when sitting some distance from the TV. The red cable is not used if connecting to the TV this way – it can just hang on its own behind the VCR and TV.
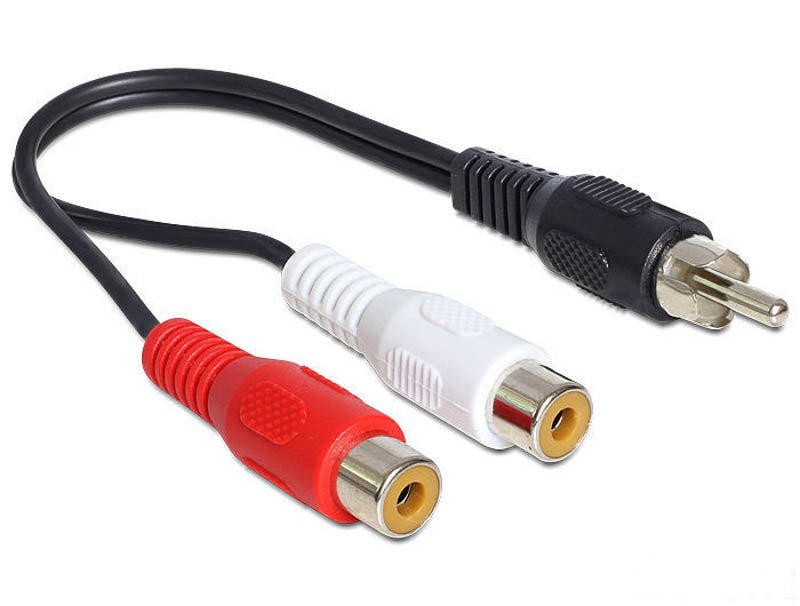
- You
 can use a cheap mono to stereo adapter cable. The single (black) plug is connected to the white audio out of the VCR. Then a normal red and white audio lead is connected from the adapter cable to the right (red) and left (white) audio in sockets of the TV. This will send the same mono audio to both the right and speakers of the TV.
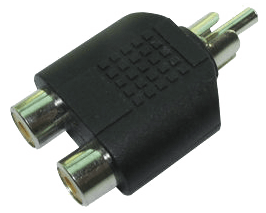
 - You can also use a mono to stereo adapter plug. This plugs straight into the ‘Audio Out”
 on the back of the VCR. Then a normal red and white audio lead is connected from the two sockets of the adapter to the right (red) and left (white) “audio in” sockets of the TV. This works exactly the same as the lead above – use whichever one is available to you.
Whichever way you connect the mono audio, you will hear the sound through the TV. Keep in mind that many video recordings were probably recorded in mono, so you are not missing much.
Don’t forget to also connect the yellow video lead from the VCR to the TV (as described above).
All Connected but no Picture
I get many questions from people who have connected their VCR to the TV by one of the above methods, but still get no picture. This could be due to a faulty lead or incorrect connections, but it could also be dirty heads on the VCR.
There is some simple tests to know if you have it all connected correctly. Insert a pre-recorded tape in the VCR and press play. Select “AV in” or similar on your TV
- First off, do you have sound? If so, you are probably connected correctly. At least the sound is working so you know you have selected the correct input on the TV.
- If you have sound but no picture, try stopping the tape and starting it again while looking at the screen. Do you see the little Play and stop icons? (some VCRs don’t display these). If you see the control icons on the TV, then you have the connections correct.
- Press stop on the VCR and press the “menu” button on the VCR remote (some older VCRs don’t have a menu). When you press menu, you should see it appear on the TV. If you do, then the connections are correct.
If you have sound, and see either the control icons and/or the menu on the TV, then the connections are correct. It probably means the VCR has dirty heads. This is very common with older tapes. If you do an internet search for “clean VCR heads”, you get to choose from over 3 million results. If any of those sound too technical for you, you can try playing the tape for a few hours. Quite often the gentle rubbing effect of the tape passing over the heads will eventually clean the heads. Be aware that no matter how you clean the heads, the next tape you insert might clog them up again – if the new tape has dirt or mildew on it.
If any of the above tests are negative, then you should cover the basics like try a different set of cables.
If possible, try using the same cables to the TV but connect them to another VCR or DVD player. This will confirm the cables are OK and the TV input is working and correctly selected.
There can be other issues with your VCR that prevent it showing a picture. There can be mechanical or electronic failures. A common fault is the rubber belts and capstans perish. These types of faults will require a proper service of the unit.
If you still have a problem to connect a VCR to your TV, list the details of the equipment and how you tried to connect them in the comments box below, and I’ll try to help you work through the issues.


