Connecting your TV is not as hard as it looks. All the sockets on the back and up the side of a flat screen TV can be imposing, but tackling them one by one reduces it to a simple task. I say simple, because you don’t need to use all of them – just the ones best suited to your equipment.
Choosing the Best Connections
So which cables, plugs and sockets should you use? It depends on what outputs your other devices have. Below is the basic hierarchy for cables and connectors when connecting devices to your flat screen TV. For more info on these connections, see the reference articles on HDMI, Component video, S-video, and Composite video.
Let us use a DVD player and a VCR as an example: if the DVD player has a HDMI output, then use HDMI to connect to the flat screen TV. That’s it, done. If the DVD doesn’t have HDMI, then use the green, blue and red component video connections with the red and white audio leads. A VCR probably doesn’t have HDMI or Component video connections, so you can use the S-video cable with the red and white audio leads. If it doesn’t have S-video, then use the basic yellow composite video cable with the red and white audio leads. Some manufacturers make a red and black coloured lead for audio – use this just the same as a red and white lead. In fact the colours don’t really matter at all, they are simply there to assist you in connecting the output sockets of the DVD player to the correct input sockets.
All about the Sockets
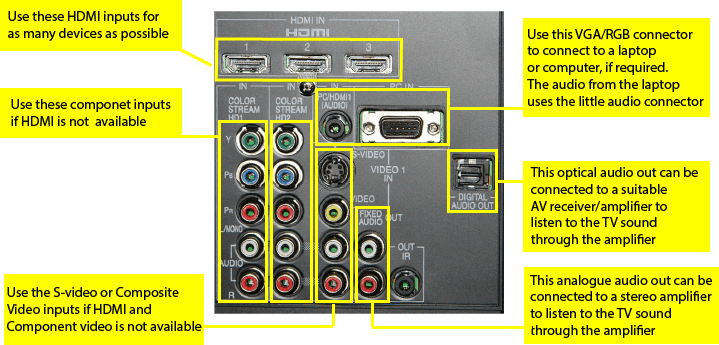
Let us look at the back of a typical flat screen TV to see how to use each socket.
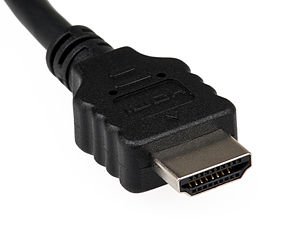
The best quality, and the simplest connection is HDMI. If you can connect all your devices using HDMI, then you probably don’t need to worry about all the other connections. If you connect a device to HDMI input 1, then use the “input” or “source” button on the flat screen TV remote control and choose HDMI input 1 to watch that program.
The next best quality is to use Component video. You need three cables for the video (red, blue and green) and two for the audio (red and white). Simply connect the green socket from the DVD player to the green socket on the flat screen TV. Do likewise for the blue and red connectors. Then use the red and white audio connectors to connect the audio. If you connect a device to Component video 1, then use the “input” or “source” button on the flat screen TV remote control to choose Component 1 input to watch that program.
After HDMI and Component video, the next best video connection is S-video. It is not always available, but if it is available, it gives better quality video than Composite video. It may also be difficult to find a S-video cable, but it is worth it if you can. You also need to connect the red and white for the audio. Some flat screen TVs have the S-video input labeled as S-video, while others will have it labeled as AV1 or AV2.
Finally, if no other connections are able to be used, you can use the basic Composite video. This is most common when connecting a VCR to your flat screen TV. This uses the yellow connection for the video, and the read and white connections for the audio. Most flat screen TVs will call this input AV1, AV2 or video in.
A lot of manufacturers are not providing a separate connection for composite video. That is, they are not providing the “yellow” socket that was common previously, like in this image:
 The solution for this is usually to use the Green “Y” socket. In the case of this example, it is also labelled “composite”. This means you would connect the yellow lead from your VCR to the green socket on this TV. With some TVs, you may need to go into the menu and tell it that you want to use the component input as a composite input, but a lot of TVs will automatically detect this. For a more detailed description, see the article How to connect a VCR to a flat screen TV.
The PC input is used to connect a laptop or desktop computer to your flat screen TV. A “Mac” computer can also use this input with the appropriate adapter plug (normally used at the computer end). This 15 pin connector is for RGB video only, so a separate cable is required for audio.
The audio out sockets can be connected to an external amplifier. This will be covered in a future article.
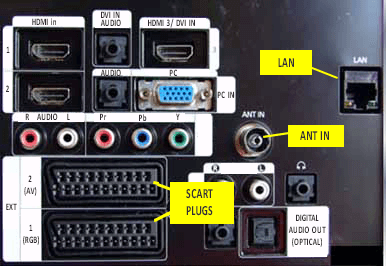
European models of flat screen TVs also have SCART connectors. These 21 pin sockets can carry composite video, RGB video and audio. You will notice on the model in this picture that the top SCART connector accepts Composite video and audio (AV), while the bottom connector accepts RGB video and audio.
Connecting to the Outside World
The “ANT IN” connector is where the cable from your antenna plugs. If you have cable TV, this will plug in here instead. If you have a PVR (Personal Video Recorder) then the antenna/cable lead will normally plug into the PVR. From the PVR will be another antenna cable to connect to the antenna in socket of your flat screen TV. More details of connecting a PVR will be in a future article.
The “LAN” connector (extreme right in the picture) is where a internet/network cable is connected. This is required for “Smart” TVs to allow you to view videos and other content on the internet directly on your flat screen TV. Some Smart TVs have a wireless network built-in, if you use this you won’t need the wired internet connection.
Power On
Once everything is connected you can connect the power lead and turn the power on. Many flat screen TVs have a separate on/off at the bottom or at the rear of the screen. Not knowing about this switch or not turning it on has caused many people to think their new flat screen TV is faulty – so beware of this trap. It also can take 3-5 secs for flat screen TVs to turn on (show a picture) once you press the “power” on button of the remote control.
Practical Points
- Before starting to connect all you equipment together, sit them in the location you want them to be. This way you will be able to work out how long each interconnecting lead will need to be.
- The correct length of interconnecting cables is a balance between aesthetics, practicality and availability. Aesthetically it is good not to have long cables bundled up making a mess behind all the equipment. Practically, you need to have the cables long enough so that you can move (pull out or turn around) each device without the cables pulling out. The availability of different lengths may be the deciding factor, but err on the side of not having the cables too short.
- Some retailers of flat screen TVs charge a premium for HDMI cables – often in the $100-$200 range. This is because they can make little or no profit from selling flat screen TVs and so try to make a greater profit on the accessories. Shop around, short high speed HDMI cables can often be bought for only $10-$20.
- Most flat screen TVs also have some input sockets on the side of the screen. These are meant to be a convenient way of connecting portable devices like cameras or laptops. They can also be used for connecting permanent devices if required – but the cables are difficult to hide.
- Many flat screen TVs have the ability to rename the input labels. This means that instead of choosing between HDMI1 and HDMI 2, the input on the screen menu will be labelled DVD player and PVR (for example). If you have more than one external device, this is an easy way for all users to easily choose the right input. You will need to look at the users guide for your particular flat screen TV to see how to do this.
Summary
Connecting your flat screen TV is not too difficult. Take each device one at a time. If possible, use HDMI. If HDMI is not an option, follow the table at the top of this article to deliver the best possible picture quality. Give it a go, you may be surprised how simple it is.
If, after reading the article, you still have problems connecting your flat screen TV, let us know via a “comment” below. Please include model numbers of all equipment you are connecting so I can try to download their manuals and determine the best way to help you.


