Energy efficient LED lamps for lighting are very popular. They certainly cost less to run than conventional lamps. But how much do you really save, and how long does it take to pay off the purchase price of the lamps?
This calculator shows how much your existing lamps cost to run, how much you can save each year with energy saving lamps, how long it will take to pay off the purchase price from the saving you make as well as showing the approximate reduction of CO2 emissions .
You need to input 7 figures:
1. Cost of one kilowatt hour (kWh) of electricity. This should be on your power bill.
Eg: your electricity costs 25 cents/kWh – enter 0.25 in the calculator
While the results are shown in $’s, they will be correct for whatever currency you use here.
2. How many hours the lamps are on each day. This is an estimate of the average hours used.
3. Number of lamps you are thinking of upgrading, or the number of lamps in one room.
4. Wattage of the existing lamps. Halogen down lights are typically 50 watts each. Most lamps have their wattage written on them.
5. Wattage of the proposed new lamps. Energy efficient lamps may only draw 4 watts, 7 watts or some other low value. Enter the wattage value of the lamps you propose to use.
6. Cost of new lamps. Enter the cost for one of the new lamps. The calculator will multiply this cost by the number of lamps entered earlier.
7. Total cost of installation labor. Enter the estimated cost for an electrician to change over all the lights. If you are doing this yourself, or a friend is doing it for free, enter 0.
Optional: Generator Type. This is used to determine the CO2 emissions. Select the type of electricity generator your supplier mostly uses. If you don’t know, don’t worry, the energy savings will still be calculated, but the emissions savings may not be correct.
Note: the calculator is best viewed in landscape mode on phones and small screens
For those who need to know, the calculations are based on the following formulas:
Savings = existing costs – proposed costs
The carbon dioxide emissions calculator is based on:
Generator
Technology
Estimated
CO2(g)/kWh
Coal
820
Natural Gas
490
Solar PV (rooftop)
41
Hydro Electric
24
Nuclear
12
Wind
11
These values are taken from the 2014 Intergovernmental Panel on Climate Change Life Cycle CO2 Equivalent from selected electricity supply technologies as listed on Wikipedia.
Knowing the cost of running an electrical appliance is useful, and easy with this power usage calculator.
You need to know three things:
1. Cost of one kilowatt hour (kWh) of electricity. This should be on your power bill.
Example: your electricity costs 24.5 cents/kWh – enter $0.245 in the calculator
You can still use this calculator even if your currency is not dollars – just enter the cost per kWh in your currency and ignore the $ sign.
2. The power used by the appliance. The power rating of an appliance is normally written on a sticker, label or plate (often at the back or under the appliance). It is also common these days for manufacturers to state the standby power of their appliances, although you may need to find the detailed specifications to read this.
The stated power of a light bulb might be 60 watts, or an electric heater might be 1000 watts.
You can also use a simple power meter.
Click here to browse simple power meters available from Amazon
Disclosure: If you buy through this link Geoff receives a small commission from Amazon
3. How many hours the appliance is used in a day. This is an estimate of the average hours used. To calculate standby power, enter 24.
Note: Some appliances like heaters, fridges and air conditioners do not use their rated power all the time they are on. These appliances normally have a thermostat allowing them to turn off when the desired temperature is reached. Therefore the hours of use entered in the calculator can be less than the actual hours of being on.
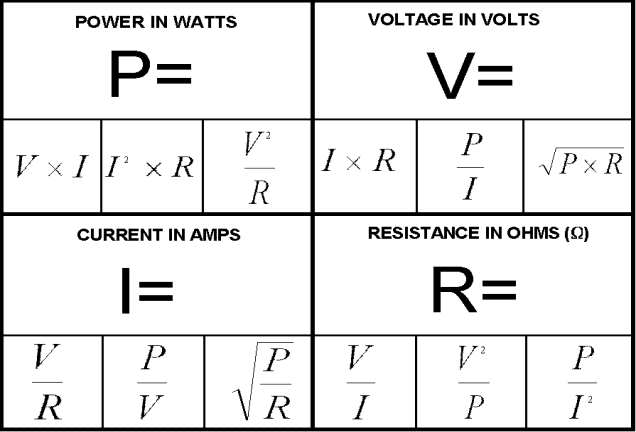
Here is a simple calculator for power, current, voltage and resistance (actually there are 6 different calculators, use the one relevant to the values you know and the values you need to know.
Note: the calculator is best viewed in landscape mode on phones and small screens
Here is a quick reference with all the possible formula combinations. You may like to print it out and stick it to your multi-meter case or workshop wall for handy future reference.
This speaker cable loss calculator simply tells you how much resistance is in your speaker cables and what decibel(dB) and power losses are attributed to your speaker cable. It also calculates the effective damping factor.
This speaker cable loss calculator is designed for low impedance systems – like Hi-Fi, home theatre and other music systems. Low impedance is a term used to refer for systems where the amplifiers are designed for speakers which have a nominal impedance of 2 to 16 ohms. High impedance systems are commonly called 70 volt or 100 volt systems, and are used mostly in commercial installations requiring more than 2 speakers connected to each amplifier. This calculator can be used to calculate speaker cable loss on high impedance systems.
Like all my calculators, simply input the required information in the white cells.
Units of Measure
First up, select the units of measure. Either “Metres & mm²” or “Feet & AWG” can be selected by clicking on the white cell and selecting from the drop down options. Most countries use metric, meaning the cable lengths are measured in metres, and the cable size is in mm². For countries not using metric, select “Feet & AWG” – the cable lengths will be in feet and cable size will be the AWG gauge number.
Cable Length and Size
Then the next two cells to fill in are the cable length and the cable size:
Cable length refers to the length of the cable from the amplifier terminals to the speaker terminals.
Cable size refers to the thickness of the speaker cable. What you enter here depends on the units of measure you chose.
Metres & mm²
Feet & AWG
Enter the Cross Sectional Area (c.s.a.) of the cable in mm² (Eg. 0.75mm² )
Enter the AWG gauge number (Eg. #18 gauge)
Specified Speaker Impedance
Speaker impedance is the impedance stated on the back of the speaker or in the speaker’s manual. It should be specified in ohms (the symbol for ohms is “Ω”). It is normally 4Ω, 6Ω or 8Ω.
Calculated Cable Losses
Once the above values are entered, you can see the calculated results in the box labelled “Calculated Cable Losses”. Here you will see the total resistance of the cable, and the resulting decibel (dB) reduction in power reaching the speaker due to the cable loss.
For many people, that is sufficient information. For example if you just want to know if your cable losses are greater or less than say 0.5dB, then you have that information.
However, if you want to know more about how the cable affects your amplifier and speaker system, then you can add in your amplifier specifications.
Amplifier Specifications
Specified amplifier power should be in the amplifier’s manual or specifications. Keep in mind that some manufacturers only state their absolute maximum power ratings, which are generally not sustainable for longer periods of listening or are come with considerable distortion. I advise you use the most conservative ratings, which should be stated as “Average Continuous Power”, “Continuous Power” or “RMS Power”. A major Hi-Fi manufacturer shows the following in their specifications:
Here they use “Rated Output Power” for their conservative ratings. Notice the THD (Total Harmonic Distortion) is very low (0.07%), unlike their stated maximum power which has 10% THD!
Note that all power output ratings of an amplifier are at a specified impedance. For best results in the calculator, use the stated output power at the impedance closest to your speaker’s impedance. For example, if you have an 8 ohm speaker connected to the amplifier, using the specification above, enter “90” for the stated output power, and “8” for the load impedance.
If the specifications only have a power rating at one stated impedance (Eg: 100 watts @ 4 ohms), use that specified output power and that specified load impedance.
Damping factor should be another listing in the specifications of the amplifier. If it is, and it is something you are concerned about, then also enter the stated amplifier damping factor in the white cell.
If you can’t find the damping factor, or it is of no or little interest to you, then it doesn’t matter.
Calculated Damping Factor & Maximum Power
This box uses a simple diagram to display the maximum power output of the amplifier, the maximum power loss in the cable, and the resulting maximum power reaching the speaker. Note, these values are based on the amplifier running at the specified maximum continuous power.
The calculated damping factor is also displayed in this box.
Note: the calculator is best viewed in landscape mode on phones and small screens
Download Calculator as Excel File
Prices in US$
What do the results mean?
While the results of the above speaker cable loss calculator are theoretically correct, how they are interpreted will depend on which school of thought you subscribe to, how good you think your ears are and how much you care.
Some people suggest the cable losses should be less than 0.3dB. Others say anything less than 0.5dB is not discernible. Others say that if you don’t run the system at maximum power, then simply adjust the amplifier volume control to the level you want and you don’t need to worry about any losses.
Then there is the damping factor to consider (or not). If you’re unaware of damping factor (DF), then there are myriads of articles about it, and just as many suggestions as to what value you should aim for.
Basically, the effective DF indicates the ability of the amplifier to control the speaker’s movement (especially any overshoot). It mainly concerns the low frequencies, and a low DF can result in the some of the low frequencies (like a kick drum) sounding a bit soft or “muddy”.
Some people suggest the effective damping factor should be above 100. Others suggest 50 is good to aim for, and others suggest 10-25 is acceptable. Other people don’t care. It is mostly regarded that the higher the effective DF the better.
The effective DF is mostly determined by the cable resistance and the speaker impedance. An 8 ohm speaker will almost double the effective DF compared to a 4 ohm speaker. Decreasing the cable loss (by using a thicker and/or shorter cable) will increase the effective DF.
Summary
Speaker cable loss is something to be considered, along with many other factors like speaker impedance, sensitivity, power rating and frequency range, amplifier power, and budget.
A thicker speaker cable will decrease the cable loss, increase the damping factor, and increase the cost.