Home Blog Page 3

Ohm’s Law Calculator

0

Here is a simple calculator for power, current, voltage and resistance (actually there are 6 different calculators, use the one relevant to the values you know and the values you need to know.

Note: the calculator is best viewed in landscape mode on phones and small screens


For a better understanding of what all this means, read the articles on the What is Electrical Power and The Dreaded Ohm’s law.

Here is a quick reference with all the possible formula combinations. You may like to print it out and stick it to your multi-meter case or workshop wall for handy future reference.

Power Usage Calculator

0

Knowing the cost of running an electrical appliance is useful, and easy with this power usage calculator.

You need to know three things:

1. Cost of one kilowatt hour (kWh) of electricity. This should be on your power bill.

Example: your electricity costs 24.5 cents/kWh – enter $0.245 in the calculator

You can still use this calculator even if your currency is not dollars – just enter the cost per kWh in your currency and ignore the $ sign.

2. The power used by the appliance. The power rating of an appliance is normally written on a sticker, label or plate (often at the back or under the appliance). It is also common these days for manufacturers to state the standby power of their appliances, although you may need to find the detailed specifications to read this.

The stated power of a light bulb might be 60 watts, or an electric heater might be 1000 watts.

You can also use a simple power meter.

Click here to browse simple power meters available from Amazon

Disclosure: If you buy through this link Geoff receives a small commission from Amazon


3. How many hours the appliance is used in a day. This is an estimate of the average hours used. To calculate standby power, enter 24.

Note: Some appliances like heaters, fridges and air conditioners do not use their rated power all the time they are on. These appliances normally have a thermostat allowing them to turn off when the desired temperature is reached. Therefore the hours of use entered in the calculator can be less than the actual hours of being on.


Amplifier, Speaker & SPL Calculator

40

These calculators will find how loud an amplifier and speaker combination will be, or what size amplifier you need to make a speaker a certain loudness.

There are five factors which contribute to how loud a speaker will be:

1) The distance from the speaker. Sound drops off the further you are away from a speaker.

2) The SPL required. This is how loud you want the sound to be at the distance specified. Some general levels are:

  • 70-80dB  for speech only
  • 80-95dB for light music
  • 95-110dB for heavy music

3) The speaker sensitivity. This is not an indicator of how sensitive the main (human) speaker is, but rather a measurement of the sensitivity of the loudspeaker. It should be available in the specifications for the loudspeaker (see Understanding Speaker Sensitivity for more info).  It is normally stated as the SPL measured 1 metre in front of the speaker with 1 watt of power driving the speaker. Hence the specification will read something like:

Sensitivity (1W/1m) = 85dB

4) Amplifier headroom. This is an allowance for the amplifier to cope with peaks without distortion. At least 3dB headroom is generally recommended. Note that for every 3dB allowance, the power requirement doubles.

5) The power of the amplifier, measured in watts.

In the calculator below, first input the distance from the speaker (and select feet or meters). From this distance the Sound Pressure Level (SPL) loss over that distance is calculated in decibels (dB).

Then, fill in the input fields of either calculator depending on if you want to know the required power for a target SPL (use the first calculator), or if you want to know how loud a given amplifier will be (use the second calculator).

Note: the calculator is best viewed in landscape mode on phones and small screens

Download Calculator
as Excel File
Prices in US$

Note: these calculations are for “open-air” where there are no reflections from walls, ceiling and/or floors. When reflections are present, the SPL losses can be reduced by up to 6dB.

For those who need to know, the formulas used for these calculations are:

\large{SPL\ loss = {20\times Log_{10}\left(\frac{Distance\, from\, Spkr\left(meters\right)}{1}\right)}

and

\large{ Amplifier\ power =  \large{10^\frac{required\,amp\,gain}{10}}

Lighting Costs Comparision Calculator

0

Energy efficient LED lamps for lighting are very popular. They certainly cost less to run than conventional lamps. But how much do you really save, and how long does it take to pay off the purchase price of the lamps?

This calculator shows how much your existing lamps cost to run, how much you can save each year with energy saving lamps, how long it will take to pay off the purchase price from the saving you make as well as showing the approximate reduction of CO2 emissions .

You need to input 7 figures:small calculator

1. Cost of one kilowatt hour (kWh) of electricity. This should be on your power bill.

Eg: your electricity costs 25 cents/kWh – enter 0.25 in the calculator

While the results are shown in $’s, they will be correct for whatever currency you use here.

2. How many hours the lamps are on each day. This is an estimate of the average hours used.

3. Number of lamps you are thinking of upgrading, or the number of lamps in one room.

4. Wattage of the existing lamps. Halogen down lights are typically 50 watts each. Most lamps have their wattage written on them.

5. Wattage of the proposed new lamps. Energy efficient lamps may only draw 4 watts, 7 watts or some other low value. Enter the wattage value of the lamps you propose to use.

6. Cost of new lamps. Enter the cost for one of the new lamps. The calculator will multiply this cost by the number of lamps entered earlier.

7. Total cost of installation labor. Enter the estimated cost for an electrician to change over all the lights. If you are doing this yourself, or a friend is doing it for free, enter 0.

Optional: Generator Type. This is used to determine the CO emissions. Select the type of electricity generator your supplier mostly uses. If you don’t know, don’t worry, the energy savings will still be calculated, but the emissions savings may not be correct.

Note: the calculator is best viewed in landscape mode on phones and small screens

For those who need to know, the calculations are based on the following formulas:

\large Yearly\ cost = {\left(\frac{cost \, per \, kWh \times hours \, of \, use \times lamp \,wattage \times No.\, of \, Lamps}{1000}\right) \times 365}

Savings =  existing costs – proposed costs

\large\ Days\ to\  recover\ price = {\left(\frac{No.\,of\,lamps\times lamp\,cost\,+\,installation\,costs}{yearly\,savings}\right)\times365}

The carbon dioxide emissions calculator is based on:

Generator
Technology
Estimated
CO2(g)/kWh
Coal820
Natural Gas490
Solar PV (rooftop)41
Hydro Electric24
Nuclear12
Wind11

These values are taken from the 2014 Intergovernmental Panel on Climate Change Life Cycle CO2 Equivalent from selected electricity supply technologies as listed on Wikipedia.

Speaker Dispersion Calculator

1

If you look at the specifications of speaker boxes, you should see something like Dispersion (H x V): 90 x 50. This is stating the nominal angle of high frequency dispersion in the horizontal and vertical plane.  These figures can be used to calculate the nominal spread of the high frequencies in the horizontal and vertical plane (who said all that trigonometry at school was useless?)

Using the calculator below, simply enter the values in the horizontal and vertical angle boxes. Also enter the distance of the measuring point to the speaker (and select feet or metres).

Example 1: The seating area of a small church or hall is 10 meters deep. Use “5” as the throw distance to determine the width of the high frequencies spread half way down the hall.

Example 2: Ceiling speakers (often rated at 110 degrees (circular spread)) are to be mounted on a ceiling 2.4 metres (8ft) high. If the audience is predominately seated you would use a throw distance of 1.2 metres (2.4m – 1.2m) or 4ft (8ft-4ft). This assumes the height of a sitting person is 1.2 metres (or 4ft). Note: for ceiling speakers with a uniform dispersion angle (circular), simply use the same input (110 degrees) for both horizontal and vertical.

Download Calculator
as Excel File
Prices in US$

Note: These calculations only give an approximation as the specified figures used are only an average of different high frequencies, and are given for when the SPL at these frequencies are 6dB below the level directly in front of the speaker. However they give a good indication of the expected spread of the high frequencies (required for good speech intelligence).

For those who need to know, the formula used for these calculations is:

\large Width\  of\ spread = {tan\left(\frac{angle}{2}\right) \times Throw\, Distance \times 2}

Increase Amplifier Power and Volume Calculator

0

amplifier power and volume calculatorHow much do you need to increase the gain of an amplifier to make it sound twice as loud: 3dB, 6db or 10 dB?

This amplifier power and volume calculator will help you understand that doubling the amplifier power does not double the sound pressure level (SPL) or the perceived loudness.

You can also use this amplifier power and volume calculator to see what effect a bigger amplifier may or may not have on the perceived volume.

Note: the calculator is best viewed in landscape mode on phones and small screens

For an explanation of these results, see the article on Double Amplifier Power does not Double the Volume.

For those who need to know, the formulas used for these calculations are:

\large Decibel\ Gain = {10\times Log_{10}\left(\frac{final\, power}{initial\, power}\right)}

\large Power\ Gain =  {\frac{final\, power}{initial\, power}}

\large Sound\ Pressure\ Level = {10^\frac{dB\,Gain}{20}}

\large Perceived\ Loudness\ Level = {2^\frac{dB\,Gain}{10}}

Maximum Noise (Decibels) and Time Exposure Calculator

0

Most countries have a stated maximum continuous noise level over a continuous 8 hour period (a working day). This is normally agreed to being a maximum continuous noise level of 85dB for 8 hours.

Some authorities then say for every 3dB increase of continuous noise level, the maximum exposure time is halved.

Other authorities say for every 5dB increase of continuous noise level, the maximum exposure time is halved.

These calculators show results for both the 3dB standard and the 5dB standard. Check your local authority to know which standard you should use.

There are two calculators, the first converts the hours of continuous exposure under 8 hours to maximum continuous noise levels (in decibels) over that exposure duration.

The second calculator converts the continuous noise level over 85dB to the maximum continuous exposure time for that noise level.

Note: the calculator is best viewed in landscape mode on phones and small screens


For those who need to know, the formulas used for the 3dB standard calculations are:

Maximum\; Noise\; (dB) = (\large\lvert3\times Log_{2}{\left(\frac{Hours}{8}\right)}\rvert+ 85)

Maximum\; Duration\; (hours) =  \Large\frac{8}{2^\left(\frac{dB-85}{3}\right)}

and for the 5dB standard calculations:

Maximum\; Noise\; (dB) = (\large\lvert5\times Log_{2}{\left(\frac{Hours}{8}\right)}\rvert+ 85)

Maximum\; Duration\; (hours) =  \Large\frac{8}{2^\left(\frac{dB-85}{5}\right)}

Double amplifier power does not double the volume

The relationship between amplifier power and volume is often misunderstood. This is partly due to terms like decibels, SPL, psycho-acoustics and other technical words. This article will unwrap this topic, explain some of these terms, let you discover some answers for yourself with an interactive exercise and also offers a calculator to help you understand the relationship of amplifier power, sound pressure and loudness.

Decibels: on the level

A lot of confusion comes from the use of decibels, or rather the misuse of decibels. Decibels are used to simply describe the ratio of two levels. This might be two levels of power, two levels of voltage, two levels of sound pressure or two levels of loudness.

For a general introduction to decibels see the updated article on understanding decibels.

Amplifier Power: watts this?

Amplifier power is the number of watts (measurement of power) a particular amplifier can produce (normally when it is flat out). For a better understanding of amplifier power and the different terms used to describe it, see Understanding Amplifier Power.  Typical ratings for amplifier power are:

  • HiFi amplifiers:  20 watts to 100 watts
  • Small PA systems: 30 watts to 250 watts
  • Large sound systems: 100 watts to 3000 watts or more

Amplifier power corresponds to acoustic power. Doubling the amplifier power increases the acoustic power by 3dB. For example:

  • Increasing an amplifier from 25 watts to 50 watts (double the power) increases the acoustic power by 3dB.
  • Increasing an amplifier from 25 watts to 100 watts (4 times the power) increases the acoustic power by 6dB. This is same as doubling the power from 25 watts to 50 watt (3dB), and then doubling the 50 watts to 100 watts (another 3 dB), giving the total increase of acoustic power of 6 dB or 4 times the power.
  • Increasing an amplifier from 25 watts to 250 watts (10 times the power) increases the acoustic power by 10dB.

The following table gives some more examples:

dB ChangePower change
+3x 2
+6x 4
+10x 10
+20x 100
+40x 10,000

However, please note that doubling the power does not double the Sound Pressure

Sound Pressure:  it’s in the air

Acoustic power (produced by the amplifier) causes sound pressure waves to move in the air. This is commonly called sound pressure.  It is this sound pressure that our ears hear and microphones sense. The sound pressure is also what a sound pressure level (SPL) meter measures (in dBs). While the sound pressure is related to the acoustical power, doubling the acoustic power does not double the sound pressure.

  • increasing the sound pressure by a factor of two (double) requires an increase of 6dB (x4) in amplifier power
  • increasing the sound pressure by a factor of 10 (x 10) requires an increase of  20dB (x100) in amplifier power

The following table gives some more examples of these relationships:

dB ChangeSound pressure changePower change
+3x 1.41x 2
+6x 2x 4
+10x 3.16x 10
+20x 10x 100
+40x 100x 10,000

This tables show that:

  • a 3dB increase in the amplifier power will double the acoustic power but only increase the sound pressure by a factor of 1.4
  • a 6dB increase in the amplifier power will double the sound pressure, (and the power will be x 4)
  • a 20dB increase in the amplifier power will give 10 times the sound pressure and 100 times the power

Note: While increasing the power level by a factor a four doubles the sound pressure, this doesn’t mean the volume is doubled.

Volume or Loudness – it’s in the head

While acoustic power can be easily calculated and sound pressure can be easily measured, volume or loudness is subjective. It is the perceived level our ears and brain associate with different sound pressures. Volume level and loudness level are the same thing, I’ll call it loudness level. Loudness level will be perceived slightly differently by each person. It will also depend on the type of sound, the duration of the sound, how we feel, and all sorts of other subjective factors.

People who study these things are called psycho-acousticians. Most studies suggest that we need an increase of around 10dB for our hearing to perceive double loudness. Some studies suggest as low as 6dB.

What do you think? If your HiFi amplifier has a digital display which tells you the output volume in decibels, use your amplifier for the following exercise. If you don’t have access to a digital output display, you can use the following samples.

dB LevelSampleRelative to -20db
-20dB
0dB
-19dB
+1dB
-18dB
+2dB
-17dB
+3dB
-16dB
+4dB
-15dB
+5dB
-14dB
+6dB
-13dB
+7dB
-12dB
+8dB
-11dB
+9dB
-10dB
+10dB
  • Set the level at -20dB (or click the -20dB play button above) and listen to the loudness.
  • Move the volume to -17dB (or click the -17dB play button above). This is an increase of 3dB, which is double the power, but it doesn’t sound like double the volume to our ears.
  • Move the volume to -14dB (or click the -14dB play button above). This is an increase of 6dB, which is 4 times the power and twice the sound pressure. This may sound like twice as loud as -20dB, or close to it.
  • Continue to adjust the volume (or click different buttons above) and hear the level change. What level sounds twice as loud to you?
  • What level sounds half as loud as -10dB to you?

As stated above, it is different for each person, and it depends on the duration,  type of music/noise and other factors. For the sample pink noise above, it may sound twice as loud anywhere from +6db to +10dB above the reference level of -20dB.

Whatever level you perceive as twice as loud, it is not at +3dB, which is twice the power. It is normally more than +6dB (4 times the power). Historically it is considered to be around +10dB, which is 10 times the power. This following table summarises the increases (the loudness is based on 10dB gain for double loudness).

dB ChangeLoudness ChangeSound Pressure ChangePower ChangeComments
+3x 1.23 (+23%)x 1.4x 2twice the power
+6x 1.52 (+52%)x 2x 4four times the power, twice the sound pressure
+10x 2x 3.16x 1010 x the power, around twice the loudness
+20x 4x 10x 100100 x the power, 10 x the sound pressure, around 4 times the loudness
+40x 16x 100x 10,000loud!

All this tells us that doubling the amplifier power does not double the perceived loudness or volume.

The percentage values are interesting. In general terms:

  • Double the power (+3dB) gives around 25% increase in perceived volume
  • Four times the power (+6dB) gives around 50% increase in perceived volume
  • 10 times the power (+10dB) gives around 100% increase in perceived volume

To help you appreciate the difference a bigger amplifier may or may not have, use the following calculator. Simply input the first amplifier power and then the second amplifier power, and see the different levels of power, SPL and perceived loudness. The perceived loudness is based on the common understanding of requiring 10dB to perceive double loudness.

For those who need to know, the formulas used for these calculations are:

Decibel\ Gain = \large{10\times Log_{10}\left(\frac{final\, power}{initial\, power}\right)}

Power\ Gain =  \large{\frac{final\, power}{initial\, power}}

Sound\ Pressure\ Level = \large{10^\frac{dB\,Gain}{20}}

Perceived\ Loudness\ Level = \large{2^\frac{dB\,Gain}{10}}

And here is another formula, thanks to Earles L. McCaul, a reader from Tuscon, who pointed it out to me. With this formula you can calculate the perceived loudness increase when you increase amplifier power.

Loudness\,Increase =\left(\frac{Final\, Power}{Initial\,Power}\right)^{0.30103}

For example if you have a 10 watts going to a speaker, and then increase the power to 100 watts:

Loudness\,Increase =\left(\frac{100}{10}\right)^{0.30103} = 2

That is, it will sound twice as loud.

How to wire Four Speakers to One Amplifier

In an earlier article we looked at the issues involved in connecting multiple speakers to one amplifier. In this article we look at some of the practical ways of wiring four speakers to each amplifier (left and right) . For example, it is normal to have your main HiFi amplifier in the lounge room. It is also common to want to have some speakers in the family room, outside (patio or pool area) and in the workshop or garage.

So let’s look at the various ways of wiring at least 4 pairs of speakers to one HiFi amplifier. If you need to connect just 2 pair of speakers to a HiFi stereo amplifier (that is, 2 speakers to 1 amp), see my article on How to connect 2 speakers to 1 amplifier.

dasiy Chain

I have had many people over the years tell me it is easy to connect multiple speakers – all you have to do is wire the speakers in series. When I’ve grilled them about how they did that, they say they simply wired them as a “daisy chain”, one after the other. When questioned further, I find they have actually wired them in parallel, and have wondered why the amplifier doesn’t like it.

In the following diagrams I will only show the wiring for one side of a stereo amplifier, let’s say the left side of the stereo. In reality this wiring needs to be duplicated for the right side speakers too.

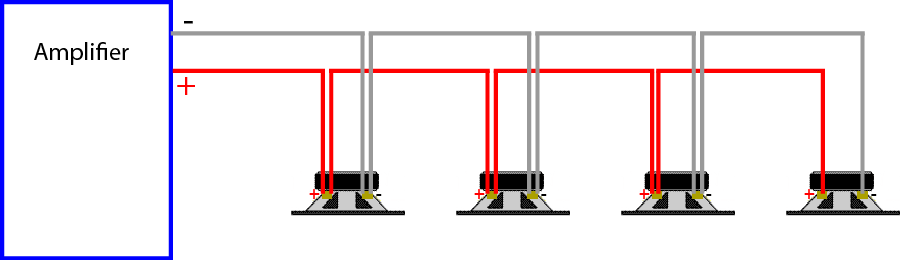
Four speakers wired in parallel

This diagram shows how to wire four speakers in parallel.

four speakers in parallel schema

Some people call this “daisy chain” as it connects one speaker after another, but it is really wiring them in parallel.

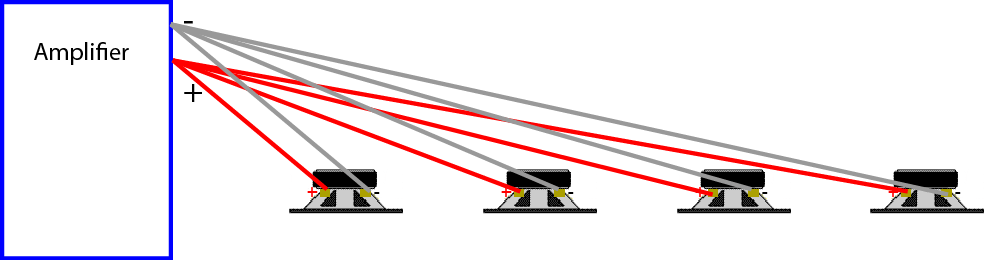
It is the same as wiring each speaker directly from the amplifier, like this:

four speakers in parallel at amp

Wiring speakers in parallel is not a good way of connecting three, four or more HiFi speakers as it puts too much load on the amplifier (as explained in earlier article)

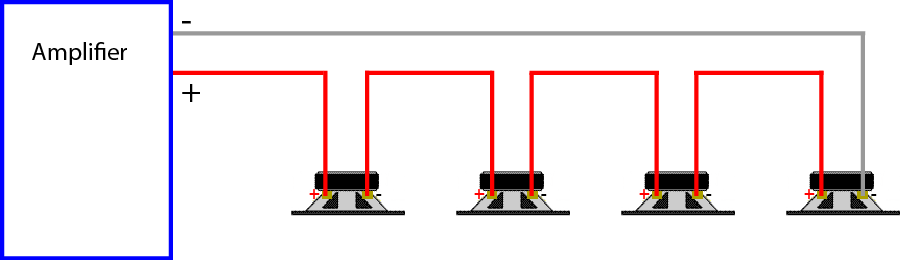
Four speakers wired in series

This diagram shows how to wire four speakers in series.

four speakers in series

Again this is not a recommended way of wiring four speakers (although it will work), nor is it very practical. Apart from the hassle of having to wire from one speaker to the next, if one wire is disconnected, then all speakers will stop working. Also each speaker affects the total load seen by the amplifier which will only allow it to work up to one eighth of its potential. This is closer to a daisy chain as each speaker and corresponding single wire forms part of a daisy chain loop.

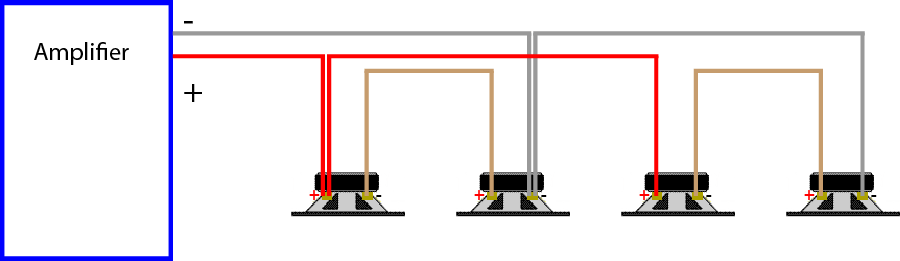
Four speakers wired in Series-Parallel

This diagram shows how to wire four speakers in series-parallel.

four speakers in series-parallel

This is a safe way of wiring four speakers (without a switch box or separate volume controls). It is a combination of series and parallel. Providing all the speakers are 8 ohms, this will work as the total impedance is also 8 ohms,

While this will technically work, it is often not practical as you need lots of wires interconnecting all the speakers and there is no control over any one speaker – they all are controlled by the amplifier volume control at the same time. This is not good if you only want music in one area of the house, and not everywhere at the same time – apparently neighbours don’t always like listening to the same music as you (through the outside speakers).

Speaker Selector Switch

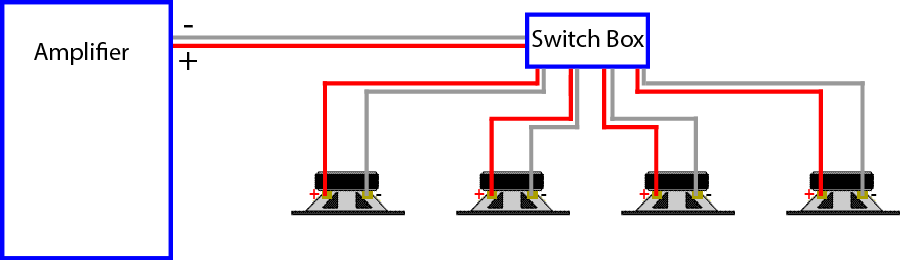
The easiest and a safe way to connect 4 pairs of HiFi speakers is to use a 4 zone speaker selector switch.

4 speakers witj switch box


This is relatively simple to wire, just run a wire from the central location (lounge room) to each speaker. The box should also look after any impedance matching to prevent amplifier overload. Although the volume will be similar in all areas, at least it is possible to turn off the speakers in the areas you don’t want sound. It is normal to locate the selector switch adjacent to the amplifier. Remember to connect the lounge room speakers to one switch so they can be turned off when you only want music outside.

Please note, speaker selector switches are designed for multi-room installs in a home. They are generally suited for low power (under 100 watts) amplifiers. They should be not be considered in a commercial install or for use with high output power amplifiers.

Four speaker zone selector

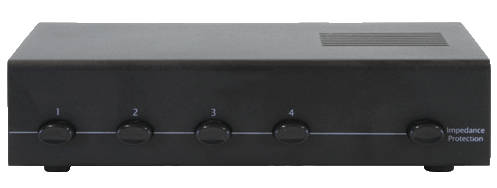
Speaker selector switches can use various techniques to allow multiple speakers to be connected to the one amplifier, namely:

  • a series resistor (around 2½ – 5 ohms) to restrict the minimum impedance of the speakers circuit to this value. This simple series resistor if often marketed as “manual impedance protection”. They are normally good for lower powered speakers, and the resistor can get hot at high volume levels. If this switch is not selected, you have no protection when running all the speakers together.
  • combining the different speakers in series and/or parallel to keep the overall impedance above 4 ohms. This is similar to the series-parallel wiring above, but it all happens in the box for you.
  • matching impedance transformers – this is the best, but it is also the most expensive.

All these methods allow multiple speakers, but at a lower volume than using just one speaker. This is logical as the signal is being shared by more than just the one speaker. To see how the power is distributed by the different types of speaker selector switches, see my Speaker Selector Switch Simulator.

If you are interested in using a speaker selector switch, check out my summary article on speaker selector switches – it discusses the features and uses in more detail, and summarises all the units bought from Amazon through this web site. You can also download the user’s manual for most models – before you buy it.

Click here to browse 4 way speaker selector switches available from Amazon
Disclosure: If you buy through this link Geoff receives a small commission from Amazon

There are also available speaker selector switches which can be controlled through your smartphone or Alexa. Geoff has written a review of the Audioflow series of switches which you can read here.

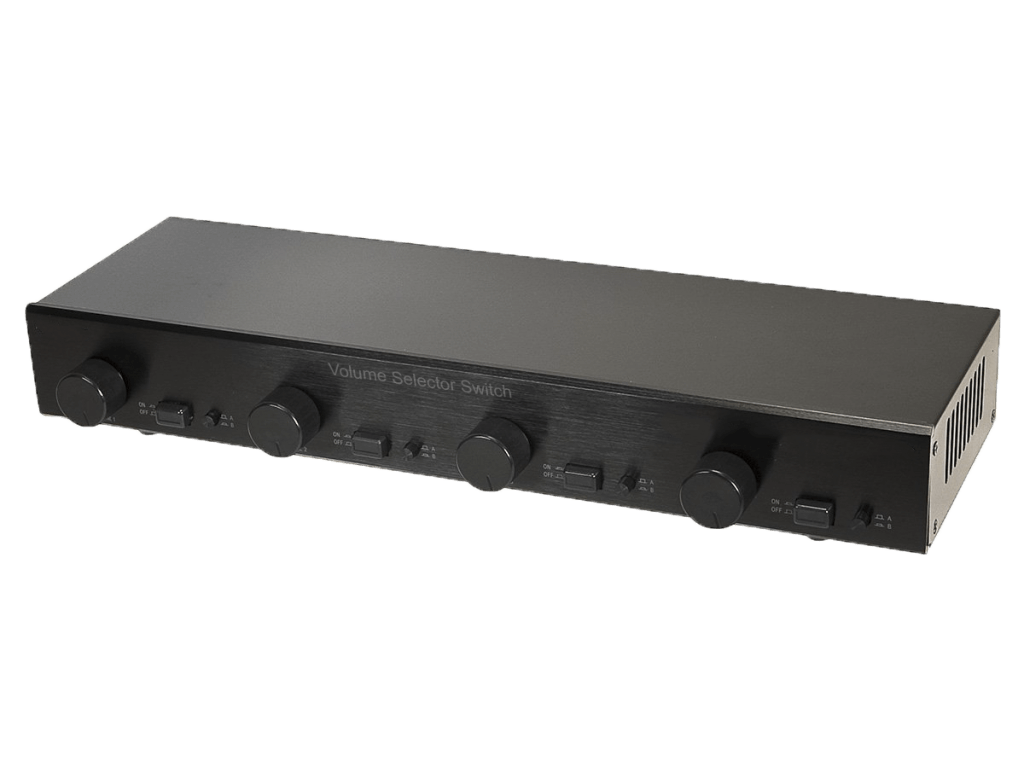
Speaker Selector with Volume Controls

A more practical (and a little bit more expensive) way it to substitute the selector switch with a unit that also has volume controls. This allows the volume in each zone (area with a pair of speakers) to be controlled at the central location.

four speakers selector volume switch

Some volume control units also have impedance matching. This means they have a switch (normally on the back panel – but sometimes inside) which allows you to tell it you are connecting 2, 4 or 8 pairs of speakers to the one amplifier. Once this switch is set, you don’t need to worry about overloading the amplifier. Some units don’t have a switch but are set for four speakers. Impedance matching works by appearing to the amplifier as just one speaker, while it evenly splits the signal to all four speakers – in reality, each speaker only gets 1/4 of the sound that comes from the amplifier (assuming you selected x4 on the switch).

Other volume control units (read cheaper) don’t have impedance matching. These units rely on you probably not needing to run all four sets of speakers flat out at the same time. While this is not as safety assured as using impedance matching, it may suit some installations. If you only want low level music in the workshop and family room, then this will be fine. If you are having a party and want loud music outside, just make sure the workshop and lounge room are turned down – this reduces the total load and this effectively means only one or two pairs of speakers are connected to the amplifier.

Remember to allow a volume control for the lounge room speakers so they can be controlled also.

Click here to browse 4 way speaker selector switches with volume controls available from Amazon
Disclosure: If you buy through this link Geoff receives a small commission from Amazon

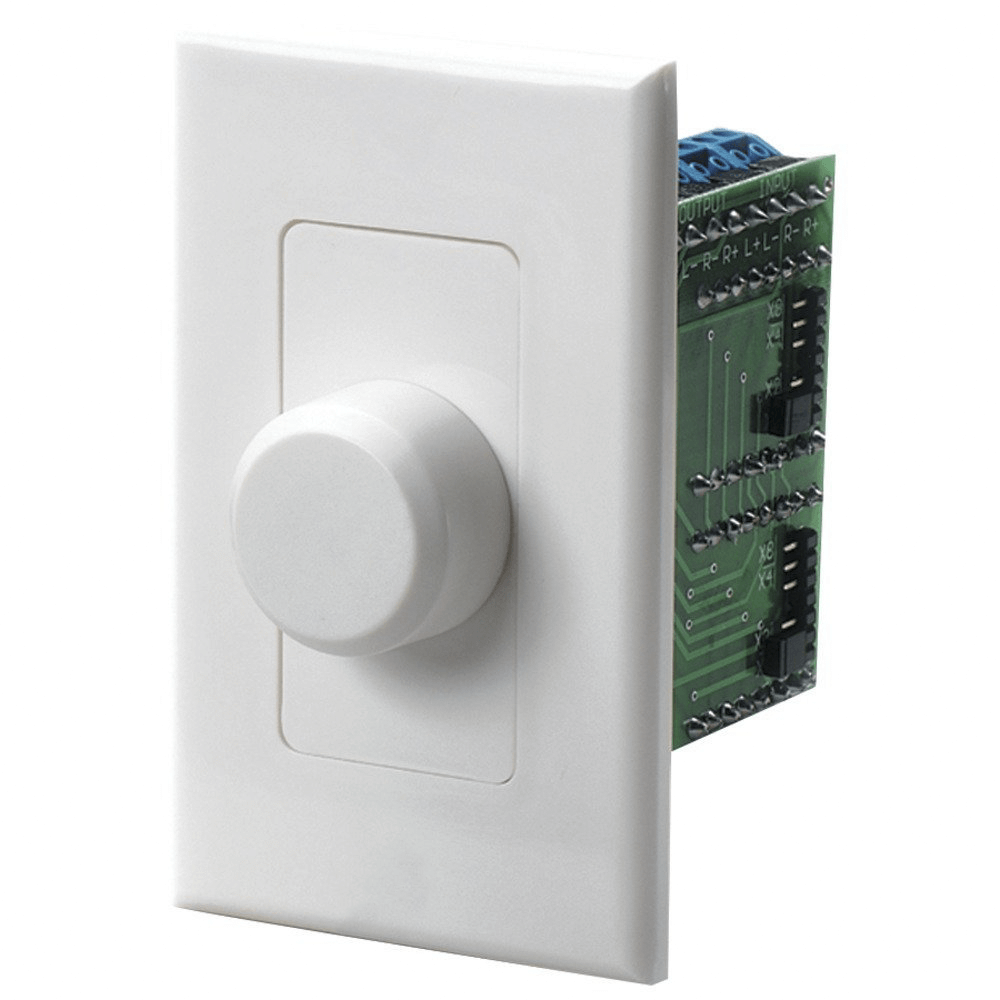
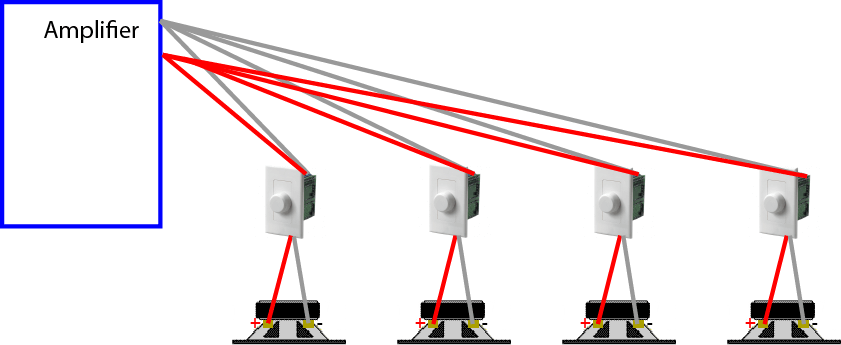
In-Wall Volume Controls

volume control

Sometimes it is not convenient to have to go to the lounge room to control the volume of the speakers – especially if you are some distance away and the phone starts to ring. Therefore it can be useful to have a volume control in each zone (area) where there are speakers. This way, the volume for the speakers for the workshop is controlled in the workshop. The disadvantage of this is if you leave the volume control up (say for the outside speakers) and the next morning you play music without going outside – you will be entertaining the neighbours with your music in the morning as well as the night before.

In-wall volume controls are similar to the volume controls mentioned above – they come with impedance matching or without impedance matching. For more than one pair of speakers you would normally want impedance matching.  If you are having two zones (two pairs of speakers or four speakers) then you will select the x2 on the back of the impedance matching volume control. Similarly, if you are using 3 or 4 pairs of speakers, you will select x4.

Bear in mind that these are mostly “in-wall” controls. If you need to mount them on a solid brick or concrete wall, you will need a big mounting block, or a deep recess in the wall. The transformers on these volume controls are normally deeper than a standard mounting block for solid walls. The greater the power handling ability of the volume controls, the larger the recess required (and the more expensive the control).

Wiring these volume controls is fairly simple. Run a speaker cable (probably two, one for left side and one right side) from the amplifier to the volume control. Then run a speaker cable from the volume control to each speaker.

four speakers with volume controls

Remember to allow a volume control for the lounge room speakers so they can be controlled also.

You can use this method for 2 speakers, 4 speakers or more.

Click here to browse wall volume controls available from Amazon
Disclosure: If you buy through this link Geoff receives a small commission from Amazon

Practical  Considerations in Wiring Four Speakers

The above installations will work, but they have some limitations. The biggest limitation is the volume control on the amplifier. This controls the maximum volume to all four speakers. The individual volume controls for each speaker only reduce the level coming from the amplifier – they can’t make the sound louder than what the amplifier produces. This means the amplifier volume control needs to be set at the level of maximum volume you want for any given speaker. However it is not wise to set it at full volume. You don’t want the amplifier running flat out but all the speakers turned way down (this is like revving the car engine at maximum and then only letting the clutch out a little bit) – far better to run the amplifier only to the maximum required.

The best method for setting up a system with speaker volume controls is:

  • turn all the speaker volume controls all the way up
  • gradually increase the volume control of the amplifier until the music is just louder that you would normally want it.
  • This is the position for the amplifier volume control.
  • you can now turn each speaker down a few steps to the level you want.

The above method will work fine until someone uses the remote control and changes the volume. This will happen regularly if you watch movies or TV and listen to the sound through your HiFi amplifier/speakers. One solution is to hide the remote control – but this isn’t always convenient. There is a better solution, but you may not need it.

The installations above with the speaker selector switch, or with the volume controls suit a number of situations. They are very suitable when you want the same music (from an MP3 player or media centre) available throughout the house and you don’t touch the amplifier. I have installed many of these systems in houses where the amplifier is only turned on in the morning and turned off at night. Sometimes the amplifier is installed in a ventilated cupboard so it is never seen nor touched. This allows the household to move around the house listening the same music in every room.

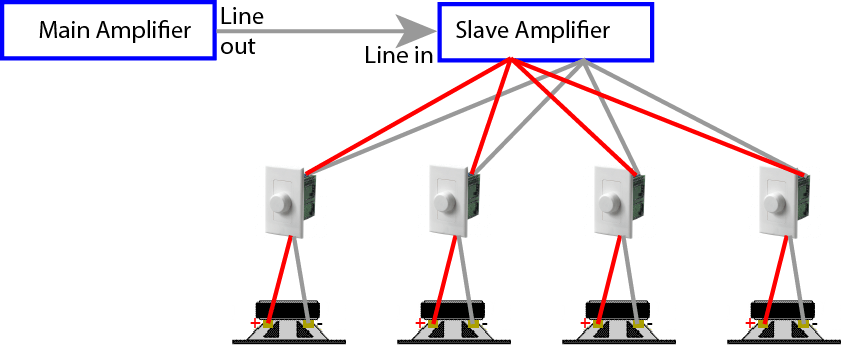
However if your amplifier is used while watching TV or movies and the volume is constantly being adjusted with the remote control, then the other speakers in house will also be adjusted accordingly. The easiest way to solve this problem is with a second amplifier.  This is my preferred method. Connect the line out of the main amplifier into the “slave” amplifier. This way, the program is the same in every room, but the HiFi amplifier volume can be changed as much as you like, without affecting the other speakers. The volume on the slave amplifier can be set (as outlined above) and then never touched.

four speakers with volume control

The slave amplifier can be a second hand amplifier, an old “stereo”, or a new stereo amplifier. Some HiFi (main) amplifiers have a power socket at the back to allow other equipment to be connected. If this is the case, then plug the slave amplifier in to this power socket and it will be turned on and off with the main amplifier.

In Closing…

I hope this has helped you understand how-to, and how-not-to, wire four (or more) pairs of HiFi speakers around your house. The video in the article Understanding Speaker Impedance explains how each of the different types of Speaker Selector Switches provides impedance protection or impedance matching. Also my Speaker Selector Switch Simulator provides an interactive way to see how they treat impedance and power sharing.

For a practical discussion on how to wire just 2 speakers to an amplifier (4 speakers to a stereo amp), see my article on How to connect 2 speakers to 1 amplifier.

If you need to wire more than four speakers, particularly in a commercial installation, see the article on Distributed Speaker Systems.

Keep in mind that changing the total load impedance of an amplifier will increase or decrease the power output of the amplifier. See Multiple Speakers Change Amplifier Power for more details. Also different speakers may sound louder or softer than others due to there sensitivity – see Understanding Speaker Sensitivity for a better understanding.

Also if the speakers each have a different impedance, then there will be different power levels available to each speaker. For more detail see How Multiple Speakers Share Power. 

Many practical examples of the methods outlined above have been explored in the comments below.

Understanding Acoustic Feedback

Acoustic feedback it that annoying loud continuous tone you get when the sound system is not set up or operated properly. Acoustic feedback can normally be reduced or eliminated if you understand and follow the basic principles and practices in this article.

What causes Acoustic Feedback?

Acoustic feedback is caused when all the right factors are lined up poorly. Acoustic feedback is basically the result of the sound level coming from the loudspeaker being picked up by the microphone, and being amplified. Then this amplified signal is again picked up by the microphone and gets amplified again. This acoustic feedback cycle continues to increase the signal level of the offending sound until it gets loud enough for everyone to stare at the sound person expecting it to be fixed.

Acoustic feedback is normally at a specific frequency. The frequency of the acoustic feedback will be frequency that is the loudest. That is, the frequency (or frequencies) that is amplified most by the microphone, amplifier, speakers and room acoustics.

Factors affecting Acoustic Feedback

The following are the main factors affecting acoustic feedback and what you can do to reduce it:

Microphone and speaker placement

Microphone proximity relative to the loudspeakers is very important. The closer a microphone is to the loudspeaker, the easier it is to have acoustic feedback. If the microphone is placed directly in front of the speaker, then the likelihood of acoustic feedback increases greatly. The greater the separation between the microphone and the speaker, the less the likelihood of acoustic feedback.

For this reason, most sound systems are set up with the speakers to the side and/or in front of the stage, and pointing away from the stage area. The microphones are placed on the stage, behind the speakers, and facing away from the speakers. The easiest and cheapest way to reduce the likelihood of acoustic feedback is to increase the separation between the speakers and the microphones.

Microphone gain

The greater the gain of the microphone channel, the greater the likelihood acoustic feedback will occur. Often the gain needs to be turned up because the person speaking is speaking too soft or is too far away from the microphone. Reducing the gain (volume or level of the microphone on the mixer) will reduce the likelihood of acoustic feedback.

This may mean placing the microphone closer to the person talking and or asking them to speak closer to the microphone. The person speaking may also need to speak louder into the microphone to avoid having to have so much microphone gain that acoustic feedback is induced.

Turning off all microphones which are not being used will decrease the overall system gain, therefore also reducing the likelihood of feedback. This may allow the microphone being used to have slightly increased gain before causing feedback.

Room Acoustics

The more reverberant a room is, the more likely sound will bounce around the room and be picked up by the microphone. If the room has sound absorbing materials on the wall and/or ceiling (or you are outside), then the likelihood of the sound bouncing off the walls back into the microphone causing acoustic feedback is reduced. This is not normally easily or cheaply achieved, so recognising and reducing the main frequencies bouncing back is required – this is a job for EQ.

Mixer and system EQ

A sound system should be set up to produce a near even sound level over the entire frequency spectrum. Such a system setup will reduce the sound level at frequencies that are amplified more by the speakers/room/system combination. It will also increase the sound level of those frequencies that are absorbed or attenuated (reduced) by the speakers/room/system combination. This system setup needs to be done every time speakers are moved or changed, or whenever a substantial change is made to the sound system.

This system set up could be called “balancing the frequencies” of the system, but is normally referred to as equalising the system. That is, it equalises the overall frequency response to make the loud frequencies less and the quiet frequencies more. Equalising is normally referred to as EQ for short. If a near even sound level is delivered over the entire frequency spectrum, then there will be less chance of any particular frequency being bounced around to cause acoustic feedback – the sound will also be more natural than before the system was equalised (EQ’d).

This topic of Equalising or EQ, is a large topic and is the subject of another article. Suffice to say if the system doesn’t have proper EQ, it is more likely to produce feedback that a system that is EQ’d correctly.

The tone controls on a mixer are also considered as EQ. Although designed more to EQ the sound of each channel, if incorrectly set, can cause acoustic feedback. This is likely to be the case if the system hasn’t been EQ’d, and the operator doesn’t know what the EQ controls (like bass, mid and treble knobs) do. If any of the channel tone controls are set to boost, then this will cause that frequency to be amplified more. This can increase the likelihood of acoustic feedback at that frequency. Consequentially, if there is some low level acoustic feedback at a particular frequency, it may be EQ’d out by reducing the gain of the appropriate tone control.

Summary

Acoustic feedback is simple, and it is complex. There are a number of factors (as listed above) to be considered when setting up a sound system to reduce the likelihood of acoustic feedback. All these factors need to be addressed correctly not to have feedback. Adhering to the basic principles outlined above will help you reduce the likelihood of acoustic feedback, and give you a better sound.