Home Blog Page 6

Understanding Decibels (part 1)

Decibels are widely used in audio, and often misunderstood. These articles give a practical understanding on using decibels in audio work.  But first, some basic questions and answers about decibels.

What is a decibel?

A decibel is a tenth of a Bel, a unit of level, named after Alexander Graham Bell. A Bel is a very large unit, so the prefix deci (one tenth) is used. A decibel uses a logarithmic scale, not a linear scale like volts or watts – see below.

There is no absolute level called a decibel. A decibel expresses a ratio. It is relative to something. Unfortunately, what it is relative to is often not mentioned when stating a decibel reading. For example, the line out of mixer might be at -10dB, this usually means it is 10dB below 0dB.

Why Decibels?

So why use a decibel? You might have noticed that the volume control on most HiFi amps is marked in decibels, as is the markings on mixer level controls. This is because our range of hearing is so vast, that to use a linear scale we would be using figures from 0 – 1,000,000!

Decibels are non linear

A secret to understanding decibels is to note that decibels are non linear. Another example of a non-linear relationship is between the side of a square and the area of a square.

decieble is non linear like square side and area
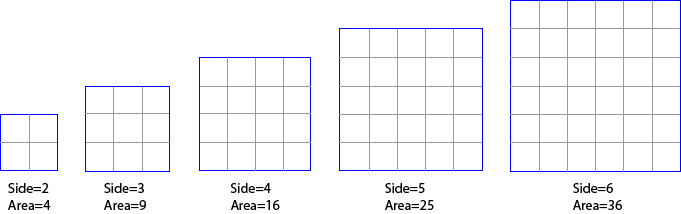
In this example, you can see that increasing the side measurement does not have an equivalent increase in area, but a larger increase.  Also, a doubling in the side length does not double the area – it is a lot more than the double! This is an example of a non-linear relationship – in this case, a small increase in the side relates to a different increase in the area. Decibels are similar. A small change in decibels relates to a different change in the ratio of the two levels being compared.

Decibels Express a Ratio

When we are talking about audio levels, we are looking at voltages, or sound wave amplitudes. (Note: power measurements (like the power differences in an amplifier) use a similar but different formula). But without getting into formulas etc, we need to accept the following summary of linear ratios of voltages and decibels. (I’m not showing the formulas or calculations because I reckon most people skip over them anyhow, and if you like formulas any search engine will give you as many as you like)

There are some interesting points highlighted by this table:

  • Double the voltage (x2) changes the output by 6dB (see examples below)
  • The easy ones to remember are x10 = 20dB, x100 = 40dB and x1000 = 60dB

For those who want to see other ratios and decibel values, you can use this simple calculator. Otherwise, just skip the calculator and read the examples below to help understand how decibels are used.


Example OneUnderstanding Decibels - mixer control: you increase the volume on a mixer or amplifier by 6dB: this is actually doubling the voltage that will appear at the output (because 6dB is a factor of 2 – see table). So, we could say the level is now +6dB. That is, relative to what the level was, it is now 6dB higher. Remember decibels are always relative to something, in this case, to what it was before we doubled (added 6dB to) the level.

Example Two: same scenario, but this time we lower the volume by 6dB. This means we are halving the voltage (because 6dB is a factor of 2). So, we could say the output is now -6dB (below what it was before).

These examples also show that it is possible to have positive and negative decibels. If the voltage is +6dB, it is twice the size as it was before. If is it -6dB, then it is half the size it was before.

I know it can be hard, but stay with me here, a few more examples should help.

Let’s say we have a microphone that is giving out 1 millivolt (that is, a thousandth of a volt) when we speak into it. We plug this microphone into a pre-amp (microphone input on a camera or mixer) that has a gain of 60dB. From the table above, we see that 60dB is equal to a linear ratio of 1000. Therefore, a pre-amp with a gain of 60dB is going to amplify our 1mV mic level signal by a factor of 1000, giving us a level of 1,000 millivolts or 1 volt. Behold, we now have a signal which is at line level (see article on Audio Levels).

Consequently, we could say that the level of the microphone signal is -60dB compared to the amplified line level. That is, the input is 1000th of what the output of the pre-amp is.

In practice, most microphones will produce about 10 millivolts (when spoken directly in to), so the signal only needs to be amplified by a factor of 100 to make it up to 1 volt (0.01 x 100 = 1.0). The table above tells us that a factor of 100 is 40dB.

Most mic pre-amps should amplify the signal by at least 40 dB (x100) and some will amplify up to 60dB (x1000). Most mixers have a gain control at the top of each channel. This will allow you to vary the gain of the preamp, to better match the input level.

Some video cameras (semi-professional or professional) will have a switch which allows you to switch the gain between 40dB, 50dB or 60dB gain for the preamp. The other way of stating this is to say the input is selected for -40dB, -50dB or -60dB levels. Just remember it is all relative, and the greater the number, the greater the amplification.

Have a look at the manual for your HiFi, mixer or video camera, and find out what level your mic input it expecting. If you are putting more in, it will probably cause distortion.

If for instance you are trying to connect a mixer (PA board) tape out, into your mic input, what do you need to consider?  Well, first we need to know what the output level is likely to be. Let’s say that the specifications say the tape out (line out) is  -10dBV or 316 millivolts and your mic input is looking for -50dBV (or 3.16 millivolts).  This is where decibels makes it easy. We have a level of -10dB, and need to get it to -50dB, easy, use a 40dB attenuator to reduce the level. That is easier than calculating the ratio between 316mV and 3.16mV, (which when you calculate it happens to come to a linear ratio of 100 or a logarithmic ratio of 40dB).

Again, a 40 dB attenuator is indicating a ratio, in this case the ratio between the signal in and the signal out is 40dB, or a factor of 100. That is, the output is one hundredth of the input. If you want to look at other voltage gain or attenuation ratios and decibels, have a play with my Decibel Calculator for Audio

Decibels do make calculations easy, but it can be difficult to comprehend.

In the next article we look at how to read the specifications about decibels, before looking at some real world applications.

This article is based on one I originally wrote for my friends at CamcorderUser.net, and has been refined by their helpful comments

Understanding Audio Levels

A basic understanding of the general audio levels mentioned in this article will help you avoid the common mistakes often made when connecting audio devices together. We are going to talk about three different general levels of audio signals.  The names of the three general audio levels are speaker level, line level and microphone level. For simplicity, the different audio levels are described in volts. For an understanding of decibel levels used in audio, see the articles on decibels starting here.

Speaker Level

A speaker needs a few volts of electrical audio signal to make enough movement in the speaker to create a sound wave that we can hear. Small speakers need only a few volts, but large speakers need 50-100 volts to make a loud sound.

Line Level

A speaker is connected to an amplifier. Think of your HiFi amplifier at home. What plugs into your amplifier? DVD player, CD player, radio/tuner, video camera. All these devices plug into the “line in” or “Aux in” of your amplifier.  “Line IN”, “Aux IN” and “Line OUT” all have an electrical audio signal at line level. You are probably aware of the standard red and white leads used in HiFi equipment, these all use line level. Other plugs are also used for line level. Line level is about half a volt to one (½ – 1) volt. It is the job of the amplifier to amplify the half to one volt of line level, up to the 10 volts or more of speaker level.

Note: A common error is to connect plugs and sockets together just because they fit. Don’t assume audio level based just on the type of plug being used. The same type of  plug can be used for different purposes (and different audio levels).

Microphone Level

Ok , so we have line level (about ½ – 1 volt) which goes into an amplifier to make it up to speaker level (about 10 volts or above).  What audio level do you think Mic level is? How much voltage do you think comes out of a microphone, as a result of you speaking into it? Answer: Stuff all!

The output voltage of a microphone is very low. It is measured in milli-volts, that is 1/1000th of a volt. A mic can give as little as 1 mV, or upto 100 mV, depending on how loud you speak into it. That is not very much. So what do you think is going to happen if you plug a mic directly into the line in of an amplifier? Answer: A very low level of muffled sound if anything.

Mic Pre-amps

The amplifier is wanting line level, ½ – 1 volt to produce enough signal to make the speaker work properly. But the mic is only producing milli-volts. So what is needed is a small microphone amplifier that amplifies the audio level from mic level to line level. This should go between the microphone and the amplifier. Because it is for the microphone and it is before the main amp, it is called a mic pre-amp. A mic pre-amp amplifies the milli-volts from a microphone up to line level.

Mic pre-amps are normally built into devices designed for connecting to a microphone. Equipment like an audio mixer, a digital recorder, a video camera or a computer – all these may have mic level inputs as well as line level input, or just a mic level input. .

Audio level microphone level, line level

The picture on the right shows for each input on this mixer there is a line level input (labelled Line 3 and Line 4), as well as a microphone pre-amp (labelled MIC PRE).

Obviously a microphone plugs into the mic input, as the mic inputs are connected to the in-built mic pre-amps.

A line level device would obviously plug into the line in socket.

But what if your mixer (or camera/recorder) only has a microphone input, and you need to connect a line level source to it? This would result in the line level (½ – 1 volt) being connected to the input of the mic pre-amp. The trouble is, the mic preamp is expecting only a few milli-volts. The resulting sound will be very distorted as the mic pre-amp is completely overloaded.

Attenuators

So how can we do this? How do we connect a line level to a mic level input? We have to reduce the line level down to mic level.  The technical word for this is to attenuate the signal. As an amplifier amplifies, or boosts the signal; an attenuator attenuates, or reduces the signal.

You can buy attenuators at a music shop, they are called DI boxes. DI stands for Direct Injection or Direct Input, meaning you can directly inject a line level into the mic input without any problems. It is also possible to make an attenuator, possibly with variable attenuation, to cope with different levels. It is also possible to buy or build a fixed attenuator in a cable (see my Decibel Calculator for Audio for more details). This is a cable with resistors built-in to the plugs to attenuate the line level down to mic level – this is very useful for a video camera or portable digital recorder.

Click here to browse DI Boxes available from Amazon
Disclosure: If you buy through this link Geoff receives a small commission from Amazon

Audio Level Summary

There are three main audio signal levels: mic level (millivolts), line level (around 1 volt) and speaker level (around 10 volts or more). The rule is, only plug speakers into the speaker socket of an amplifier; only line level into the line in of any equipment; and only mic level in the mic input of your mixer, camera or laptop.  The most common cause of  audio distortion comes from not understanding the different levels, and how to connect them all together.

Practical Example 1

Scenario: A keyboard (electric piano) located on the stage needs to connect to a mixer located at the back of the hall, with a microphone multi-core cable connecting between the two.

Issue: The output of the keyboard is at line level, and the microphone input at the mixer requires mic level. (There is also the issue of different plugs and balanced/unbalanced inputs but these are the topics of other articles).

Solution: Use a basic DI box available from most music or electronic stores. A DI box acts as an attenuator which reduces the line level of the keyboard to mic level for direct connection to the mixer (via the multi-core cable). The DI box also overcomes the issues of matching plugs and going from unbalanced to balanced  – so this is a perfect solution. This solution also works for connecting electric guitars, electronic drums and DVD players.

Practical Example 2

Scenario: The output (line level) of an audio mixer needs to connect to a digital camera or digital recorder which only has a microphone input.

Issue: The output of the mixer is at line level, and the microphone input of the camera/recorder requires mic level.

Solution: A basic DI box could be used, but this would require an input lead, and output lead and the DI box  – a lot to carry in your camera bag. A neater solution is to have a lead with a 40dB attenuator built into it. This will reduce the line level from the mixer by a factor of 100, which will bring the line level down to a reasonable mic level to connect directly to the microphone socket of the camera/recorder.

This article is based on one I originally wrote for my friends at CamcorderUser.net, and has been refined by their helpful comments.

What is Electrical Power?

21

What is electrical power? What is the formula for electrical power? What is watts, volts and amps? This article introduces and illustrates these electrical basics and in particular the power formula. As this is not a text book, the formula is not proved or derived.  The power formula is simply introduced and used to show some of the important principles needed in understanding and fault finding electrical or electronic things.

If you are a self-confessed electrical illiterate, then you are encouraged to read through this so that you are familiar enough to come back and use this as a future reference.

Those of you who have mental blocks when you see anything technical, or see formulas, tables and graphs, be assured there are not too many here, only the minimum necessary to illustrate the fundamental principles of electrical power are used.

What is Power?

Let’s start by asking a question: Which of these vehicles is more powerful?what is electrical power?

Certainly a tractor has a lot pushing or pulling force, or grunt, so can obviously be deemed powerful, but it can’t go very fast. A racing car, on the other hand, goes extremely fast and is called powerful accordingly, but it can’t pull heavy loads. A sports car can’t pull as much as a tractor, and can’t go as fast as a racing car, but is none the less, very powerful.

So it boils down to our definition of power. We could simply say the power of the vehicle is the combination of its ability to push (or pull) and its speed. That is, if we had a figure for the pushing (or pulling) force of a certain vehicle (we’ll call this “grunt”), and we knew its speed, then we could derive the formula:

Power of Vehicle  =  Grunt x Speed

If the following substitutions are made to get “electrical” power:

Grunt = Current                           Speed = Voltage

then the formula for electrical power looks like this:

 Electrical Power = Current x Voltage

This simple formula is one of the most important ones you will need to know for electrical work.

Knowing the common symbols and units of measurement for these characteristics is useful, and can make you sound like you really know your stuff.

NameSymbolUnits of Measurement
PowerPwatts (W)
CurrentIamperes or amps (A)
VoltageVvolts (V)

*Text books often use “E” as the symbol for voltage. This is technically correct as the proper name for voltage is Electro-Motive Force, or EMF, which the “E” symbolises. However for ease of comprehension “V” will be used, which is easier to associate with the common understanding of Voltage

That is, the formula can be written as:

P = I x V

This means that for an appliance (such as a light), which draws 1.5 amps at 12 volts, the power used by the light is calculated with this formula, therefore:

Power of Light = 1.5 amps x 12 volts = 18 Watts

If you know the wattage (power) of a 12 volt light is 18 watts, then obviously the formula can be changed around to calculate the current drawn by the light. That is:

Current = Power divided by voltage

or

I = P/V

What’s it all mean?

OK, enough theory for the moment. What does all this mean in practice? Try and follow these examples:

Example 1: You have a 60 watt, 240 volt light bulb. How much current does it draw?

I = P/V therefore Current = 60/240 = 1/4 amp.

Example 2: You have another 60 watt light bulb, but this is from your car, so it is rated at 12 volts. How much current does this one draw?12 volt light bulb

I = P/V therefore Current = 60/12 = 5 amps.

This doesn’t mean that one light is more powerful than the other, as both draw 60 watts of electrical power. However, it shows the relationship between voltage, current and electrical power. That is, for a given power (say 60 watts), if the voltage is low (12 volts), the current must be high (5 amps), and if the voltage is high (240 volts), the current will be low (¼ amp). A bit like our illustration of a tractor and a racing car: if you don’t have speed (voltage) you will need grunt (current) to get up a hill (e.g. a tractor). Similarly, if you don’t have grunt (current), you will need speed (voltage) to get up the same hill (e.g. a fast car). Please note, that like a tractor or car, don’t use the light bulb designed for one job to try to do the job of the other. In other words, don’t plug your 12 volt light into 240 volts.


Practical Points to note

1) An appliance only draws as much electrical power as it requires, you can’t push more electrical power into something than what it needs.

Example: If a light is rated at 60 watts, and you have a 1000 watt generator, then that is fine, but the light will only draw its 60 watts.


2) An appliance only draws as much current as it requires, you can’t make it take more Amps than it needs.

Example: If an electronic device is rated at 6 volts, 0.3 amps, and the power supply (battery eliminator or “plug pack” supply) is rated at 6 volts, 0.5 amps, then that too is fine, but the device will only draw the 0.3 amps it requires.


3) An appliance will generally work on slightly higher or slightly lower voltage than its rating. Normally, you should try to supply the correct voltage to all appliances.


4) If an appliance is rated at 1500 watts, it needs 1500 watts (at its specified voltage) of electrical power to work properly.

Example: If you have an electric drill rated at 1500 watts, and you try to run it from a 1000 watt generator, then it won’t work properly, and could even damage the drill and/or the generator.


5) The power rating of an appliance refers to either the power it puts out or the power it takes in.

Example 1: A generator rated at 1000 watts means it is capable of supplying up to 1000 watts of electrical power, at the specified voltage (like 220 volts).

Example 2: A light bulb rated at 60 watts, means it takes in 60 watts of electrical power to operate properly.

Example 3: A 300 watt inverter (say 12 Volts to 110 Volt) indicates it puts out 300 watts of electrical power at 110 volts, which means it will draw more than the 300 watts (due to efficiency losses) from the 12 volt battery (Note: 300 watts at 12 volts is 25 amps!)


6) The power rating of a light suggests the electrical power drawn, not the amount of light it puts out. A 20-watt fluorescent tube can put out more light than a 45-watt light bulb, because the fluorescent is more efficient at converting the electrical power to lighting power than the light bulb.


7) Transformers and motors are often measured in VA (Volts-Amps) or kVA (kilo Volt-Amps, i.e. 1000 volt-amps). For most purposes this rating can be equated to electrical power in watts, although in the strict technical sense there are differences (due to the current being out of phase with the voltage in an inductive circuit).


8) The electrical power required for an appliance is measured in watts or VA. This is normally written underneath or on the back of the appliance. To calculate the current drawn by an appliance, divide the figure for watts, by the voltage.

When you don’t have a calculator handy, “ball park” figures can be used. For ease of calculation, try using the following figures:

For 240 volts use 250 volts e.g. 1000/250 = 4 amps

For 220 volts use 200 volts e.g. 1000/200 = 5 amps

For 110 volts use 100 volts e.g. 1000/100 = 10 amps

Exercise: Inspect 10 different appliances around your house or office and determine how much current they each draw. Use the following table or one like it.

9) To see how many amps you are drawing, simply add the amps of each appliance you are using together.

Example: Your iron draws 4 amps, your room heater draws 10 amps, together they are drawing 14 amps.


10) A 4 way power board normally has a switch that cuts out when 10 amps or more is going through it. So if you have your heater and iron plugged into the one board, it will cut out and neither will work.

A simple calculator for these formula is available here.

In the next article we will see how simple the dreaded Ohms law really is…


Understanding Microphone Sensitivity

What do you understand about microphone sensitivity? Of late I have seen a number of people miss-interpret the specifications of microphones, especially when it comes to microphone sensitivity. For instance when comparing two microphones, one says it has a sensitivity of -65dBV and the other says -43dBV, which one is more sensitive? The answer is the -43dBV one.

How is microphone sensitivity specified?

Let’s start by looking at a typical specification listing for a popular vocal microphone – the Shure SM58. Under the heading of Sensitivity it states:

-56.0dBV/Pa (1.6mV)  1 Pa = 94dB SPL.

I think it is easier to start at the end and work backwards. The last bit 1 Pa = 94dB SPL is simply stating the test criteria. That is, they are using the standard of 94dB SPL is equal to one pascal. This is the normal standard used these days by most manufacturers (an older standard used one pascal as 74dB SPL). A pascal (Pa) is a unit of pressure, named after Blaise Pascal (who among other things developed the barometer). For sound levels, the standard says that a sound level of 94dB SPL (Sound Pressure Level) generates one pascal of pressure (on the microphone diaphragm).

Microphone Sensitivity in Volts

So that is our test setup, one pascal, or a sound pressure level of 94dB, is “heard” by our microphone. When this happens, the Shure SM58 will generate 1.6mV. So to compare the sensitivity of microphones, we need only to compare these figures. The higher the voltage produced at the given sound pressure level (94dB) the more sensitive the microphone is. For example if a microphone produces 15mV at the same sound level, then it is obviously more sensitive than the Shure SM58 which only produces 1.6mV.

Microphone Sensitivity in Decibels

So if that is simple enough to follow, it seems we must complicate these simple figures by converting them to decibels. Remember that a decibel is a ratio, in this case, the ratio between the produced voltage (1.6mV) and a reference level of 1 volt. This decibel ratio calculation gives us the number of -56.0dBV. That is, with the test level of 94dB SPL (1 pascal), the SM58 microphone produces a signal 56.0 decibels below one volt. These measurements are always negative. -56dBV is saying the microphone is producing a signal 56dB below the one volt reference.

To help with all this conversion from milli-Volts to decibels and back again, here is a simple calculator you can use.

Comparing Microphone Sensitivity

So there are two ways we can compare microphone sensitivity, with milli-volts or with decibels. Both ways give the same comparison. Both use a test sound pressure level of one pascal (that is, 94dB SPL).  Both comparisons are easy to do without complex formulas. Simply compare the output of each microphone in milli-volts, or in decibels below 1 volt.

So let’s compare two microphones, the SM58 and the Rode Videomic.

microphone sensitivity, rode videomic In the specs for the Videomic they state Sensitivity:

-38dB re 1 volt/pascal (12.6mV @ 94dB SPL) +/- 2dB @ 1kHz.

There it is, everything you would want to know about the sensitivity. The simple method: it produces 12.6mV at 94 dB SPL (compared to 1.6mV for the SM58) therefore it is more sensitive than the SM58. 12.6mV also equates to -38dBV/Pa or -38dB below 1 volt with a pressure of 1 pascal. Compared with the SM58 we can see the Rode Videomic is 18dB (56 – 38) more sensitive.

MillivoltsDecibels
Shure SM581.6mV (1 Pa = 94dB) -56dBV/Pa
Rode Vidoemic12.6mV @ 94dB SPL -38dB re 1 volt/pascal

Note that the higher the negative dBV, the lower the sensitivity. That is, a mic with a sensitivity of -56dBV is less sensitive than a mic with a sensitivity of -38dBV, but more sensitive than a mic with a sensitivity of -65dBV. A more logical way to look at it is to think about how much gain will be required to amplify the test signal up to a level of one volt. For the SM58, we would need a pre-amp with a gain of 56dB. For the videomic the pre-amp needs a gain of only 38dB.

The other figures in the specifications are also worth noting. Firstly +/- 2dB, this is telling us that all Videomics are within that range of sensitivity (that is between -40dBV to -36dBV). The other interesting figure is the last bit @1kHz. This is saying these figures are true and correct at the test frequency of 1kHz, or 1000Hz. Each mic is likely to be more or less sensitive at other frequencies.

More than Microphone Sensitivity

This is also telling us there is more to a good mic than its sensitivity. We must also look at its frequency response, its tone, its maximum SPL without distortion, its directionality and its handling noise among other factors. It is also important to note that mic sensitivity is not necessarily telling us it is a good mic or not. It all depends on what the mic is being used for. We wouldn’t want to use a Videomic as the vocal mic for a rock band singer, any more than we would want to use a SM58 for distance recording. But using them for their intended use is normally ideal.

Shure has been a popular brand of microphone used by professionals for many years.

Click here to browse Shure microphones available from Amazon

Disclosure: If you buy through this link Geoff receives a small commission from Amazon


Rode is a personal favourite of mine. They make great microphones, especially for recording and video work.

Click here to browse Rode microphones available from Amazon

Disclosure: If you buy through this link Geoff receives a small commission from Amazon


This article is based on one I originally wrote for my friends at CamcorderUser.net, and has been refined by their helpful comments